How can I use my cricut maker 3 in bookbinding projects?
Oh, the Cricut Maker 3 is a fantastic tool for bookbinding projects! Here are some creative ways you can use it to enhance your bookbinding endeavors:
1. Cutting Covers and Pages:
- Chipboard Covers: Use your Cricut Maker 3 to cut chipboard for sturdy book covers. The machine can handle thicker materials, giving you precise cuts for a professional finish.
- Decorative Papers: Cut decorative papers for your book covers or endpapers. You can use intricate designs to add a unique touch to your books.
2. Creating Custom Stencils:
- Stencil Designs: Design and cut stencils for embossing or painting on your book covers. This can add a personalized and artistic flair to your projects.
3. Cutting Fabric for Book Cloth:
- Book Cloth: If you’re covering your book with fabric, the Cricut Maker 3 can cut fabric pieces precisely. This is especially useful for creating uniform and neat edges.
4. Making Bookbinding Tools:
- Punching Guides: Create guides for punching holes in your signatures (the folded sheets of paper that make up the book). This ensures even spacing and alignment.
- Templates: Cut templates for spine reinforcement or decorative elements.
5. Decorative Elements:
- Vinyl Decals: Cut vinyl decals to add titles or decorative elements to your book covers.
- Paper Embellishments: Create intricate paper cutouts to embellish your pages or covers.
6. Personalized Bookplates:
- Bookplates: Design and cut personalized bookplates to adhere to the inside cover of your books. This adds a special touch, especially for gifts.
7. Binding Materials:
- Leather and Faux Leather: The Cricut Maker 3 can cut thin leather or faux leather, which you can use for binding or decorative spine elements.
8. Creating Jigs and Fixtures:
- Binding Jigs: Cut out jigs to help with the alignment and assembly of your bookbinding projects. This can make the process more efficient and accurate.
Tips for Using Your Cricut Maker 3 in Bookbinding:
- Blade Selection: Use the appropriate blade for the material you are cutting. For thicker materials like chipboard, use the Knife Blade.
- Mat Selection: Ensure you use the correct mat for your materials. The StrongGrip mat is ideal for thicker materials.
- Design Software: Utilize Cricut Design Space to create and customize your designs. You can also find templates and inspiration within the software.
By incorporating your Cricut Maker 3 into your bookbinding projects, you can achieve precise cuts, intricate designs, and a professional finish that will make your handmade books truly stand out. Happy crafting! 📚✨
More Related Questions
Hi there, this might be a stupid question and my apologies. I have nothing on my product feed and the Christmas in July event really inspired me to recreate my shop and do a physical craft product feed. When sharing product images for the feeds, do crafters use their own designs sometimes or just other products from other designers or both?
e
The feed on Creative Fabrica is full of projects crafters made themselves with work by designers. If you have a shop on Creative Fabrica, I think showing others how to use your products through your own crafting projects is a great idea!
Can you put flock vinyl over glitter viny?
Thank you for the info

I downloaded CF fonts to my Cricut, but cannot find them when I go to fonts -System? Is there a limit to the number of fonts Cricuit can hold ?
Hiya, often times you need to sign out of Design Space then sign back in once fonts have been installed on your computer/laptop. They show in the system font tab once you sign back into Design Space. xx
What is the easiest paper to cut and start crafting with?
<p>Starting with paper crafting is a delightful journey, and choosing the right paper can make all the difference!</p><ul><li><h3>Recommended Papers for Beginners</h3><ul><li><h3>Construction Paper</h3><p>Widely available and affordable, construction paper is easy to cut and comes in a multitude of vibrant colors, making it perfect for kids and beginners.</p></ul></li><ul><li><h3>Origami Paper</h3><p>Specially designed for folding, origami paper is thin yet crisp, available in various patterns and colors, making it easy and satisfying to work with.</p></ul></li><ul><li><h3>Cardstock</h3><p>A bit sturdier than construction paper, cardstock is excellent for both simple and more complex projects. It’s great for making cards, scrapbooking, and other paper crafts that need a bit more stiffness.</p></ul></li><ul><li><h3>Colored Printer Paper</h3><p>Lightweight and versatile, colored printer paper is great for a variety of crafts from simple cut-outs to more detailed work.</p></ul></li></li></ul><p>These papers are perfect for crafting beginners, offering a balance of ease and creativity. Enjoy exploring the colorful world of paper crafting! 🎨✂️</p>

What is a cricut?
<p>Ah, the Cricut—a magical tool for crafting enthusiasts!</p><ul><li><h3>What a Cricut is:</h3><p>A Cricut is a versatile cutting machine used in crafting and DIY projects. It's often utilized for cutting paper, vinyl, fabric, and even leather, allowing for intricate designs and shapes.</p></li><li><h3>Functions and Features:</h3><ul><li><h3>Cutting:</h3><p>Precisely cuts a wide range of materials, from cardstock to vinyl, and more.</p></ul></li><ul><li><h3>Drawing:</h3><p>Can use pens to draw intricate designs or write calligraphy-style text.</p></ul></li><ul><li><h3>Embossing and Engraving:</h3><p>Some models can emboss papers or engrave materials like leather and metal.</p></ul></li><ul><li><h3>Essential for:</h3><p>Scrapbooking, custom t-shirts, home décor, and personalized gifts.</p></ul></li></li><li><h3>Popular Models:</h3><ul><li><h3>Cricut Maker:</h3><p>Known for its versatility and ability to cut over 300 types of materials.</p></ul></li><ul><li><h3>Cricut Explore Air 2:</h3><p>Popular for beginners with its user-friendly interface.</p></ul></li><ul><li><h3>Cricut Joy:</h3><p>Compact and portable, great for small projects and travel.</p></ul></li></li></ul><p>With a Cricut, the crafting possibilities are endless. 📏✨ Let your creativity run wild!</p>

I cant get design space to print a 20oz skinny straight tumbler design to print the correct size. It tells me its to big then spits out a blank sheet. What do I do to fix it?

I have to use Canva for tumblers, save as pdf and print off Adobe. You can also use an 11x17 page if you want to print from Cricut.
Looking for a turkey side card?
<p>Creating a turkey side card can be a delightful crafting project, perfect for adding a festive touch to any Thanksgiving or fall celebration.</p><ul><li><h3>Materials Needed</h3><p>- Cardstock (in various fall colors)
- Scissors
- Glue or double-sided tape
- Markers or colored pencils
- Googly eyes (optional)
- Template for turkey or freehand design skills</p></li><li><h3>Steps to Create a Turkey Side Card</h3><ul><li><h3>Step 1: Create the Card Base</h3><p>Fold a piece of cardstock in half to create the card base. You can choose a size that suits your preference, such as a standard greeting card size or a more compact version.</p></ul></li><ul><li><h3>Step 2: Design the Turkey</h3><p>Draw a turkey shape on the cardstock or use a template. Include features like the body, head, and feathers. You can use different colors for each part to make it lively.</p></ul></li><ul><li><h3>Step 3: Cut Out and Assemble</h3><p>Carefully cut out the different parts of your turkey. Assemble them onto the front or side of the card, using glue or double-sided tape. Position the turkey at one side of the card for a 'side card' effect.</p></ul></li><ul><li><h3>Step 4: Add Details</h3><p>Add googly eyes for a whimsical touch. Draw or use cut-outs for the beak, wattle, and other details. You can even add a little sign in the turkey's "wing" with a fun Thanksgiving message.</p></ul></li><ul><li><h3>Step 5: Final Touches</h3><p>Use markers or colored pencils to add any additional details, such as texture on the feathers or a decorative border around the card.</p></ul></li></li></ul><p>Enjoy crafting your turkey side card, which will surely bring smiles to all who see it. Happy crafting! 🦃</p>
What tools and equipment do I need to cut and assemble 3D SVGs, especially for more intricate designs?
<p>Crafting intricate 3D SVGs can be a delightful adventure! Here's a rundown of the essential tools and equipment to get you started:</p><ul><li><h3>Cutting Tools and Machines</h3><ul><li><h3>Electronic Cutting Machines</h3><p>Devices like Cricut or Silhouette are perfect for intricate designs. They precisely cut various materials such as paper, cardstock, or vinyl.</p></ul></li><ul><li><h3>Precision Cutting Tools</h3><p>Craft knives or scalpels are handy for small adjustments and intricate cuts that a machine might miss.</p></ul></li></li><li><h3>Assembling Tools and Adhesives</h3><ul><li><h3>Manual Crafting Tools</h3><p>This includes scissors for quick trims and a bone folder for sharp creases.</p></ul></li><ul><li><h3>Adhesives</h3><p>Tacky glue or a glue pen works well for paper, while hot glue guns can be useful for sturdier materials.</p></ul></li></li><li><h3>Additional Equipment for Assembly</h3><ul><li><h3>Tweezers and Scoring Tools</h3><p>Tweezers help with placing tiny pieces accurately. Scoring tools ensure clean folds in paper pieces.</p></ul></li><ul><li><h3>Cutting Mats</h3><p>Protect your surfaces while cutting and provide a stable base for crafting.</p></ul></li></li></ul><p>With these tools in your crafting arsenal, you're well-equipped to create stunning 3D SVGs. Happy crafting!</p>
I HAVE HAD A CRICUT MAKER FOR THREE YEARS AND HAVEN'T USED IT YET. HOW DO I SCREEN PRINT ONTO A T-SHIRT? I HAVE TO MAKE 10 BY THE END OF THE WEEK. AND I KNOW BETTER THAN TO VOLUNTEER WHEN I'M SO BUSY. SOMEONE PLEASE HELP ME.
Hello. If you've never used your Maker and you need these by the weekend, my answer to you would be to farm out the project to do for you. Some companies would print out what you need and you can then iron them on your t-shirts. The reason I say this is because learning the program 'Design Space' is not something you do in one day. So have someone else print the sublimation design and iron it on to your t-shirt. When you are less busy, tackle learning Design Space and everything you want to do will be a breeze after that. Examples of companies that can print for you are DTFSheet and Ninja Transfers. Good luck. You can also Google to find companies that might be local to you.

Is there anyone that sells in Amazon KDP?
<p>While my specialty is crafting, design, and DIY projects, it's exciting to delve into creative ventures like publishing on platforms such as Amazon KDP.</p><ul><li><h3>Exploring Amazon KDP as a Creative Business</h3><p>Amazon KDP (Kindle Direct Publishing) allows you to publish books and other creative content independently. This can include everything from novels and children's books to journals and crafting guides. It’s a fantastic way for creatives to reach a broad audience.</p></li><li><h3>Key Steps for Success on Amazon KDP</h3><ul><li><h3>Understanding Your Niche</h3><p>Identify a niche you are passionate about, such as crafting tutorials or DIY project ideas. This can help you create content that resonates with readers interested in these topics.</p></ul></li><ul><li><h3>High-Quality Content Creation</h3><p>Focus on creating valuable and engaging content. Use your crafting and design skills to add visual appeal to your work, especially if creating illustrated books or guides.</p></ul></li><ul><li><h3>Effective Marketing Strategies</h3><p>Leverage social media and crafting communities to promote your KDP content. Sharing your expertise and insights on crafting can build an audience eager to see your published work.</p></ul></li></li><li><h3>Utilizing Creative Fabrica for Content</h3><p>Creative Fabrica offers a wealth of design tools and assets that can enhance your KDP projects. From unique fonts and graphics to template creation, your publishing journey can benefit greatly from these resources.</p></li></ul><p>Publishing on Amazon KDP is a creative adventure! For those delving into this realm, I’m eager to see how your crafting expertise shines through. 🎨📚</p>
I see in examples, digital papers used on phone cases, bags, wrapping paper etc. How is this done??
<p>Using digital papers for various crafts and products allows for a wide range of creative possibilities! Let's explore how this is typically done.</p><ul><li><h3>1. Understanding Digital Papers</h3><p>Digital papers are high-resolution images with patterns or designs that can be used in digital or physical formats. They are versatile and often used in crafting, scrapbooking, design projects, and more.</p></li><li><h3>2. Applications of Digital Papers</h3><ul><li><h3>Phone Cases</h3><p>Design software, such as Creative Fabrica Studio or Adobe Photoshop, is used to apply digital paper designs to phone case templates, which can then be printed by a phone case manufacturer.</p></ul></li><ul><li><h3>Bags</h3><p>Similarly, digital paper designs can be positioned on tote bag templates using design software. Once the design is finalized, it is printed on fabric and assembled into a bag.</p></ul></li><ul><li><h3>Wrapping Paper</h3><p>Digital papers can be directly printed on large sheets of paper to create custom wrapping paper. This involves using a quality printer that can handle the size and paper type.</p></ul></li></li><li><h3>3. Steps to Use Digital Papers</h3><ul><li><h3>Choose Your Design</h3><p>Select a digital paper design that suits your project. Many platforms, like Creative Fabrica, offer diverse digital paper collections.</p></ul></li><ul><li><h3>Template Selection</h3><p>Find or create a template for the item you're designing (phone case, bag, or wrapping paper) in your design software.</p></ul></li><ul><li><h3>Apply the Design</h3><p>Overlay the digital paper on the template and adjust its position, scaling, and rotation as desired. Ensure that all important areas are covered by the design.</p></ul></li><ul><li><h3>Finalize the Design</h3><p>Once the design is applied, make any necessary tweaks. Use design tools to ensure alignment, color matching, and clarity.</p></ul></li><ul><li><h3>Print and Assemble</h3><p>Send the design to a printer suitable for your chosen medium—whether it's a print-on-demand service for phone cases and bags or a personal printer for wrapping paper.</p></ul></li></li></ul><p>With the right digital tools and templates, crafting with digital papers can lead to beautiful, custom-made products! Enjoy exploring the creative possibilities.</p>
Which Siser heat machine is best for me to get, I want to start subminiating on t-shirts: https://www.siser.com/heat-presses/?
<p>When you're starting with sublimation on t-shirts, choosing the right heat press machine is crucial for quality and efficiency.</p><ul><li><h3>Factors to Consider</h3><ul><li><h3>Size of the Heat Press</h3><p>Make sure to choose a size that fits your project needs. For t-shirts, a 15x15 inch heat press is often recommended as it covers standard shirt sizes effectively.</p></ul></li><ul><li><h3>Frequency of Use</h3><p>If you plan to make sublimation a regular activity or business, investing in a sturdier, more durable machine may be beneficial.</p></ul></li><ul><li><h3>Pressure and Temperature Control</h3><p>Look for a machine with adjustable pressure and temperature settings to accommodate various fabric types and ensure optimal results.</p></ul></li></li><li><h3>Recommended Siser Heat Presses</h3><ul><li><h3>Siser Digital Clam Heat Press - 15" x 15"</h3><p>Ideal for starter projects with its compact size. Offers digital controls for precision heating and pressure settings.</p></ul></li><ul><li><h3>Siser Swing Away Heat Press</h3><p>Provides even pressure and heating. Its swing-away design allows for better visibility and easy placement of garments and transfers.</p></ul></li></li></ul><p>Choosing the right heat press will set you up for successful sublimation projects. If you want to explore more creative tools or templates, Creative Fabrica Studio offers great resources!</p>
What's the best paper card to use for my 3d paper craft project?
I'm trying to create this from Dreaming Tree: https://www.creativefabrica.com/product/christmas-tree-luminary-svg/

<p>Creating a 3D paper craft project is an exciting endeavor! Choosing the right paper can make all the difference in achieving a sturdy and appealing design.</p><ul><li><h3>Types of Paper for 3D Paper Crafts</h3><ul><li><h3>Cardstock</h3><p>Cardstock is a popular choice for 3D paper crafts because of its thickness and durability. It comes in various weights, typically ranging from 65 lb to 110 lb, making it excellent for constructing detailed structures that require stability.</p></ul></li><ul><li><h3>Cover Stock</h3><p>Similar to cardstock but generally heavier, cover stock offers an even sturdier option. It's perfect for larger projects that might need extra support.</p></ul></li><ul><li><h3>Bristol Paper</h3><p>Bristol paper is a heavy paper with a smooth surface, often used for high-detail work and intricate cutting. It is less flexible but very sturdy, making it suitable for precise crafts.</p></ul></li><ul><li><h3>Patterned or Specialty Paper</h3><p>For added visual interest, consider using patterned or specialty papers like glitter or metallic finishes. These can be layered with cardstock for texture while still maintaining structure.</p></ul></li></li><li><h3>Considerations When Choosing Paper</h3><ul><li><h3>Weight</h3><p>Ensure the weight of the paper is appropriate for your project's requirements. Heavier papers support intricate designs better.</p></ul></li><ul><li><h3>Texture</h3><p>A smooth texture can provide a clean look, while a textured paper can add depth and interest.</p></ul></li><ul><li><h3>Color</h3><p>Choosing colors that complement your design concept can enhance the overall aesthetic of the finished piece.</p></ul></li></li><li><h3>Additional Tips</h3><p>Experimenting with test pieces can help determine how well your chosen paper works with your specific design, especially if you're incorporating folds or complex shapes.</p></li></ul><p>Have fun crafting your 3D masterpiece, and happy crafting! 🎨✂️</p>

How do you get your printer to print text backward for sublimation?

I know that some say you should "mirror" your image in your software program while you are designing. However I prefer to mirror my image in my printer settings prior to printing. I suppose it is simply a matter of choice.

Comment choisir une police écriture qui, une fois importée dans Cricut space, est utilisable en un seul trait plutôt que double trait avec l'outil stylo?
<p>Lors de l'utilisation de polices pour le stylo dans Cricut Design Space, il est important de choisir des polices qui sont des "écritures à un seul trait" pour éviter l'effet de double trait.</p><ul><li><h3>Trouver des polices à un seul trait</h3><p>Ces polices sont conçues pour imiter une écriture manuscrite qui peut être réalisée avec une seule ligne continue. Voici comment en trouver :</p></li><li><h3>Options sur Creative Fabrica</h3><ul><li><h3>Recherche de polices spécifiques</h3><p>Utilisez des termes de recherche tels que "single line fonts" ou "one line fonts" lorsque vous naviguez sur des plateformes comme Creative Fabrica.</p></ul></li><ul><li><h3>Utilisation de Fontcloud</h3><p>Fontcloud de Creative Fabrica peut être un outil utile pour organiser vos polices et vous assurer que vous utilisez toujours la bonne pour votre projet.</p></ul></li></li><li><h3>Vérifier le rendu dans Design Space</h3><p>Avant d'imprimer, faites un test rapide dans Cricut Design Space pour voir comment la police se comporte avec l'outil stylo.</p></li></ul><p>En suivant ces conseils, vous devriez pouvoir obtenir un trait simple qui convient à vos projets d'écriture avec Cricut.</p>

How can I make a name big enough so I can put it on a tshirt for the pocket? I design it but then I put it on my gang sheet and its tiny and low quality.
<p>Creating a name design big enough for a t-shirt pocket requires ensuring it's set correctly for printing not just in size but in resolution as well.</p><ul><li><h3>Steps for Creating a Crisp T-Shirt Pocket Design</h3><ul><li><h3>Design at the Right Size</h3><p>Create your name design in a graphics software at the actual size it will be printed, typically around 3 to 4 inches in width for a pocket, ensuring it fills the intended space appropriately.</p></ul></li><ul><li><h3>Check the Resolution</h3><p>Ensure your design is set to a high resolution, ideally 300 DPI (dots per inch), which is suitable for quality printing. This will avoid low-quality prints.</p></ul></li><ul><li><h3>Use Vector Graphics</h3><p>Design your name in a vector format (like SVG or AI). Vector graphics can be resized without losing quality, making them perfect for designs that need to maintain clarity at various sizes.</p></ul></li><ul><li><h3>Export Correctly</h3><p>When exporting your design, choose formats that retain quality, such as PNG for raster images or SVG for vector images.</p></ul></li><ul><li><h3>Use Creative Fabrica Tools</h3><p>If you need assistance in converting your raster design to a vector format, use Creative Fabrica’s Vectorizer tool. This tool can help maintain the quality of your design when resizing.</p></ul></li></li><li><h3>Using a Gang Sheet Effectively</h3><ul><li><h3>Plan Your Layout</h3><p>Ensure all elements on the gang sheet are positioned adequately for their intended sizes. Consider organizing your gang sheet with similar-sized elements to avoid confusion.</p></ul></li><ul><li><h3>Print Preview</h3><p>Before printing, do a test print on regular paper or use software proofing features to ensure everything appears at the correct size and quality.</p></ul></li></li></ul><p>With these steps, you should be able to print a crisp and perfectly sized name onto your t-shirt pocket. Happy crafting! 🎨👕</p>
What printers are best for 80 lb cardstock?
<p>When it comes to printing on 80 lb cardstock, choosing the right printer is crucial for achieving great results.</p><ul><li><h3>Printer Types Suitable for 80 lb Cardstock</h3><ul><li><h3>Inkjet Printers</h3><p>Inkjet printers are often the most versatile choice for printing on heavier cardstock. They handle different media types well and provide vibrant colors, which is perfect for crafting and design projects.</p></ul></li><ul><li><h3>Laser Printers</h3><p>Laser printers are great for high-volume printing and produce sharp, crisp text and images. However, manual feeding might be necessary for thicker media like 80 lb cardstock.</p></ul></li></li><li><h3>Features to Consider</h3><ul><li><h3>Manual Feed Tray</h3><p>Ensure the printer has a manual feed tray or bypass tray, which allows for thicker paper handling without jamming.</p></ul></li><ul><li><h3>Adjustable Paper Settings</h3><p>Printers with adjustable settings for different media weights help ensure the best print quality. Look for printers that allow you to set custom paper types and weights.</p></ul></li><ul><li><h3>Resolution Support</h3><p>For clear and detailed print quality, especially for graphics and photos, look for a printer with high DPI (Dots Per Inch) support.</p></ul></li></li><li><h3>Recommended Printers</h3><ul><li><h3>Canon PIXMA Series</h3><p>Known for excellent color reproduction and versatility in handling various paper types including heavier cardstock.</p></ul></li><ul><li><h3>Epson SureColor Series</h3><p>Offers exceptional image clarity and sharpness, ideal for artistic projects that require high-resolution prints.</p></ul></li><ul><li><h3>Brother HL-L series</h3><p>A robust choice for laser printing, known for handling a range of paper weights without sacrificing text quality.</p></ul></li></li></ul><p>Choosing the right printer will ensure your cardstock projects come out beautifully, whether you're making greeting cards, posters, or other craft creations.</p>

Do cricut has the tool that us a brush that can match color for other project? If the answer is positive where do I find it., if not , why?
You can use Color Sync
Why does cricut make something’s so “hard” to do but the silhouette makes the same process much easier?
<p>Navigating Cricut versus Silhouette can be quite the crafty conundrum for many creators! Each platform has its own quirks and features.</p><ul><li><h3>Design Software Complexity</h3><p>Cricut uses the Design Space software, which some users find a bit limiting in customization compared to Silhouette Studio's features, especially in terms of freehand drawing and file importing capabilities.</p></li><li><h3>Cutting Machine Features</h3><p>Silhouette machines often offer more robust cutting settings with finer adjustability, which some users find to be more intuitive for detailed designs. Cricut focuses more on ease of use and user-friendliness, which can lead to some limitations in customization.</p></li><li><h3>Learning Curve</h3><p>Silhouette can have a steeper learning curve initially but offers more advanced features for those familiar with design software, while Cricut aims for easier accessibility at the start, which might feel restrictive for advanced users.</p></li></ul><p>For those seeking a balance, Creative Fabrica offers tools like the Vectorizer and Background Remover, which can enhance your design capabilities outside of these platforms. Happy crafting and creating magical masterpieces! ✂️🎨</p>
What laundry soap is used to wash the rhinestone shirts?
<p>When washing rhinestone shirts, it's important to choose a laundry soap that is gentle on the embellishments while effectively cleaning the fabric.</p><ul><li><h3>Recommended Laundry Soaps</h3><ul><li><h3>Liquid Detergents</h3><p>Choose a mild liquid detergent as it dissolves better and is less likely to leave residue on the rhinestones.</p></ul></li><ul><li><h3>Delicate Wash Detergents</h3><p>Specialty detergents designed for delicates are usually a great choice for embellished garments like rhinestone shirts.</p></ul></li></li><li><h3>General Tips for Washing Rhinestone Shirts</h3><ul><li><h3>Use a Gentle Cycle</h3><p>Always wash rhinestone shirts on a gentle cycle to prevent damage.</p></ul></li><ul><li><h3>Cold Water Wash</h3><p>Use cold water to avoid loosening the adhesive on the rhinestones.</p></ul></li><ul><li><h3>Turn Inside Out</h3><p>Turning the shirt inside out minimizes wear on the rhinestones during washing.</p></ul></li><ul><li><h3>Avoid Fabric Softener</h3><p>Skip fabric softeners as they can reduce the adhesive grip on the rhinestones.</p></ul></li><ul><li><h3>Air Dry</h3><p>It's best to air dry your rhinestone shirts to keep the embellishments intact.</p></ul></li></li></ul><p>By following these recommendations, you can help ensure your rhinestone shirts stay sparkling and beautiful after each wash! 🌟</p>
Ive only had my cricut for a few months and its not cutting through my material, even though I have it on the correct settings? I've tried the ball of foil and no luck. What am I doing wrong? Is my blade dull already? Do you all carry extra blades when this happens? Thank you in advance for your help. 😊?
My blade isn't cutting all the way through my material and my cricut is only 3 months old.
<p>Having issues with your Cricut not cutting properly can be frustrating, but there are a few steps to troubleshoot and get back to crafting smoothly! 🌟</p><ul><li><h3>Troubleshooting Steps</h3><ul><li><h3>Check Blade Installation</h3><p>Ensure that the blade is properly seated in its holder and securely fastened.</p></ul></li><ul><li><h3>Clean the Blade</h3><p>Sometimes materials can stick to the blade, causing it not to cut well. Carefully remove and clean the blade tip with a soft brush or cloth.</p></ul></li><ul><li><h3>Cutting Mat Condition</h3><p>Make sure your cutting mat is sticky enough to hold the material in place firmly. If not, cleaning or replacing the mat might help.</p></ul></li><ul><li><h3>Material Compatibility</h3><p>Double-check that the material is compatible with your machine settings and is placed correctly on the mat.</p></ul></li><ul><li><h3>Software and Firmware Updates</h3><p>Ensure that your Cricut software and machine firmware are updated to the latest versions.</p></ul></li></li><li><h3>When to Replace the Blade</h3><p>If you've checked and cleaned everything and the problem persists, the blade could indeed be dull. Frequent cutting with certain materials can wear them out more quickly.</p></li><li><h3>Keeping Spare Blades</h3><p>Yes, it is a good idea to have extra blades on hand. This ensures you'll have a backup when a blade wears out or if you switch between different types of materials frequently.</p></li></ul><p>Hopefully, these tips help get your Cricut cutting like a dream again! If issues persist, reaching out to Cricut support might be the next best step. Happy crafting! ✂️✨</p>

Best type of paper to print in a home printer?
<p>When choosing the best type of paper for printing on a home printer, several factors come into play.</p><ul><li><h3>Factors to Consider</h3><ul><li><h3>Printer Type</h3><p>Inkjet and laser printers may require different paper types. Inkjet printers often work well with thicker, high-quality paper, while laser printers are optimized for specific laser paper.</p></ul></li><ul><li><h3>Purpose of Printing</h3><p>Consider if you’re printing photos, documents, or crafts as they can all have specific paper requirements.</p></ul></li></li><li><h3>Recommended Paper Types</h3><ul><li><h3>Standard Copy Paper</h3><p>Ideal for everyday document printing. It’s usually 20 lb weight paper, providing a good balance of affordability and quality.</p></ul></li><ul><li><h3>Premium Photo Paper</h3><p>For high-quality photo prints, photo paper is coated to hold ink in place, providing vivid and sharp images.</p></ul></li><ul><li><h3>Thick Cardstock Paper</h3><p>Great for crafting projects or durable prints. It’s typically heavier and thicker, making it suitable for invitations, greeting cards, and art projects.</p></ul></li><ul><li><h3>Matte Finish Paper</h3><p>Provides a non-glare finish which is excellent for text-heavy documents and graphics that need a subtle finish without shine.</p></ul></li><ul><li><h3>Glossy Paper</h3><p>Best used for photographs and projects that aim to have a shiny, vibrant finish.</p></ul></li></li></ul><p>Selecting the right paper depends on your specific printing needs, and experimenting with a few options might help you achieve the best results for your projects!</p>

I made a first time vinyl project to go on a cooler with removable vinyl. Will it have been better to do it with permanent vinyl to last?
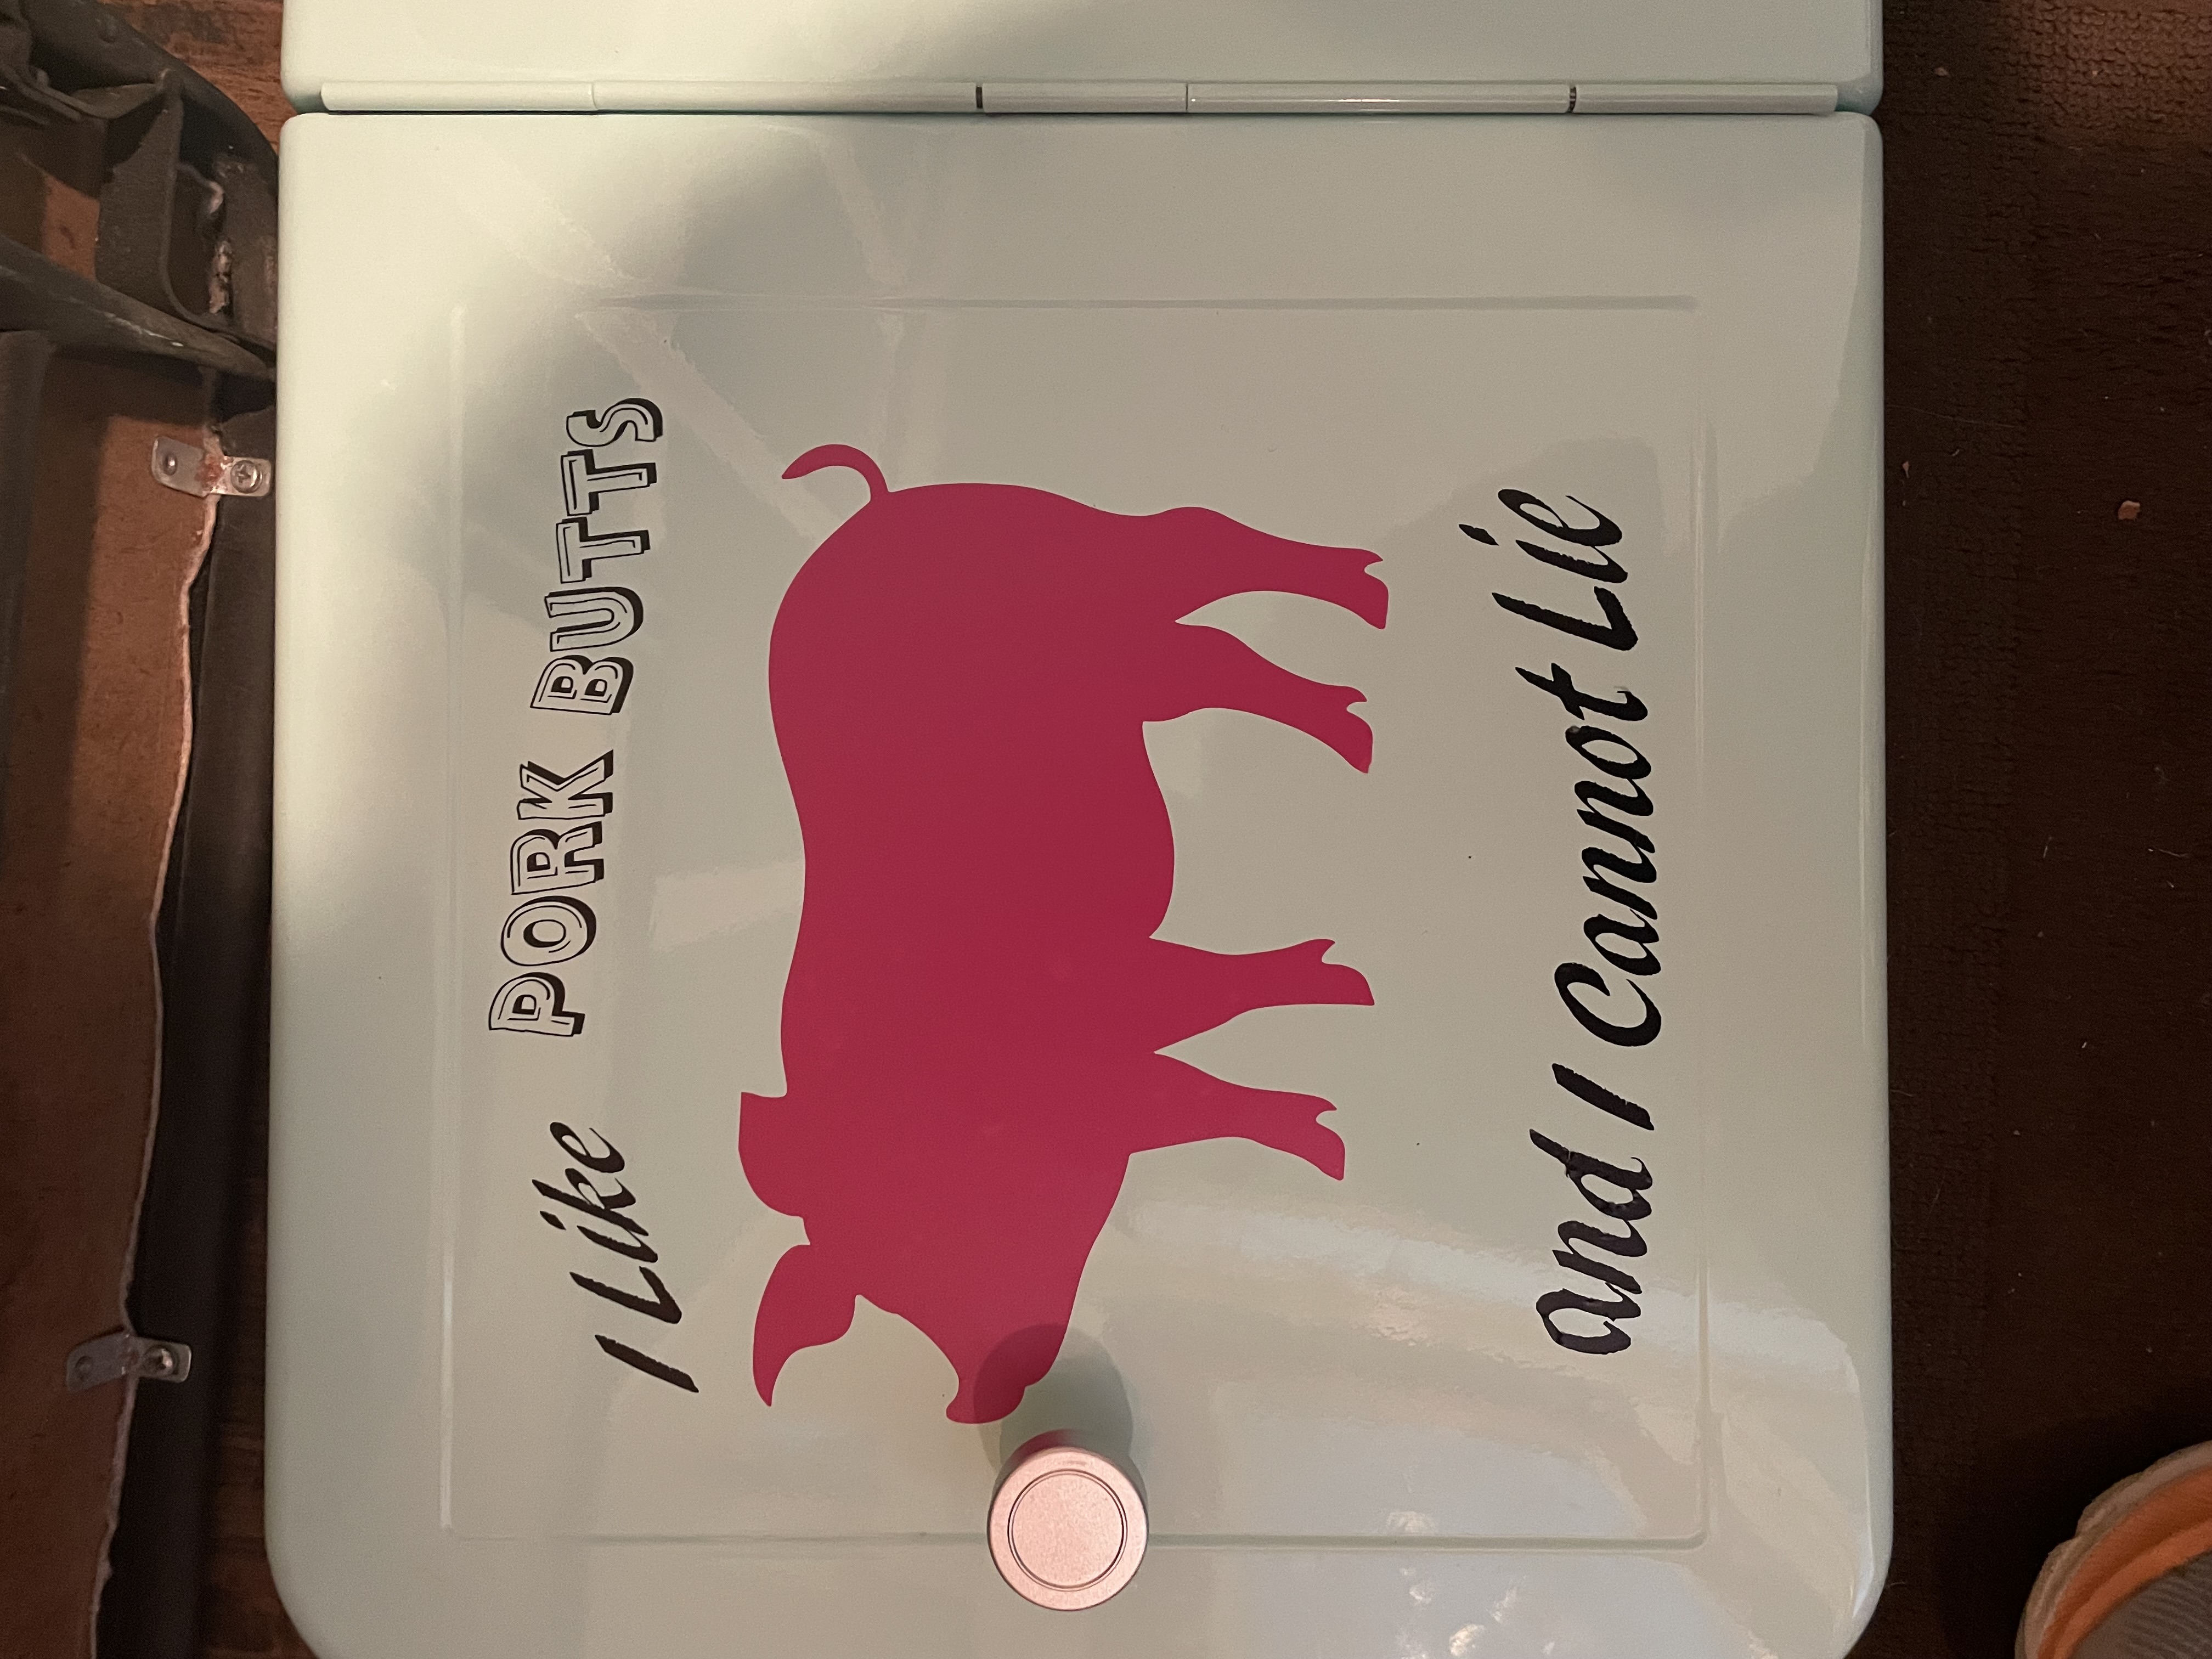
<p>Crafting with vinyl can be so much fun, and each type of vinyl has its purpose!</p><ul><li><h3>Vinyl Types</h3><ul><li><h3>Removable Vinyl</h3><p>Ideal for temporary projects or for surfaces where you want to easily remove the vinyl without residue. It's great for seasonal decor or items where a short-term application is desired.</p></ul></li><ul><li><h3>Permanent Vinyl</h3><p>Suitable for long-lasting projects. It's weather-resistant and more durable than removable vinyl, making it perfect for items like coolers that may be exposed to the elements.</p></ul></li></li><li><h3>Considerations for Using Permanent Vinyl</h3><p>If you intended for the design on the cooler to endure longer, using permanent vinyl would indeed be more appropriate. It provides better adhesion and is more resistant to water and sunlight.</p></li><li><h3>Tips for Applying Permanent Vinyl</h3><ul><li><h3>Surface Preparation</h3><p>Make sure the cooler's surface is clean and dry to ensure the vinyl adheres properly.</p></ul></li><ul><li><h3>Apply With Care</h3><p>Use a squeegee or a similar tool to smooth the vinyl onto the cooler, ensuring there are no air bubbles.</p></ul></li><ul><li><h3>Curing Time</h3><p>Allow the vinyl to cure for 24-48 hours before exposing it to water or outdoor conditions to ensure it adheres fully.</p></ul></li></li></ul><p>You've got this! Whatever the outcome, it's a great opportunity to learn for future projects. 🌟 Feel free to explore other creative techniques on your cooler or other surfaces!</p>
What vinyl works well on plastic cups, bowls, etc.
<p>When crafting with plastic cups and bowls, choosing the right vinyl is key to ensuring your designs last and adhere well.</p><ul><li><h3>Types of Vinyl</h3><ul><li><h3>Permanent Adhesive Vinyl</h3><p>This type of vinyl is ideal for use on plastic as it is made to hold up against washing and general wear. It's particularly good for items that will be handled frequently.</p></ul></li><ul><li><h3>Outdoor Vinyl</h3><p>Often used for cars and outdoor signage, outdoor vinyl is designed to be durable and weather-resistant, making it a good choice for plastic items that may be used in outdoor settings.</p></ul></li></li><li><h3>Tips for Using Vinyl on Plastic</h3><ul><li><h3>Clean the Surface</h3><p>Before applying vinyl to plastic, clean the surface thoroughly with soap and water or rubbing alcohol to remove any oils or residues.</p></ul></li><ul><li><h3>Consider Using a Primer</h3><p>For added adhesion, use a plastic primer or an application fluid that helps the vinyl stick better to the plastic surface.</p></ul></li><ul><li><h3>Curing Time</h3><p>Let the vinyl sit and cure for at least 24 hours before heavy use or washing to ensure strong adhesion.</p></ul></li></li></ul><p>With the right type of vinyl and proper preparation, your projects on plastic surfaces will look fantastic and last a long time! 🎨✨</p>
I see lots of discussion regarding Laser cuts. Can a Cricut maker do Laser cuts or do you need a special machine for this?
<p>Laser cutting and Cricut machines serve different purposes in the crafting world.</p><ul><li><h3>Difference Between Laser Cutters and Cricut Machines</h3><p>While both laser cutters and Cricut machines are used for cutting materials, they operate using different technologies. Laser cutters use a high-powered laser to slice through materials, providing precise and intricate designs. Cricut machines, on the other hand, use small blades to cut through various materials like paper, vinyl, and cardstock. They do not have the capability to perform laser cutting.</p></li><li><h3>When to Use a Laser Cutter</h3><ul><li><h3>Materials</h3><p>Laser cutters can handle a wide range of materials including wood, acrylic, metal, glass, and fabric.</p></ul></li><ul><li><h3>Precision</h3><p>Ideal for projects requiring fine, intricate cuts and engraved details.</p></ul></li><ul><li><h3>Industrial Use</h3><p>Often used in industrial and professional crafting settings due to their ability to handle tougher materials.</p></ul></li></li><li><h3>When to Use a Cricut Maker</h3><ul><li><h3>Materials</h3><p>Best for cutting and crafting work with softer materials like paper, cardstock, vinyl, leather, and fabric.</p></ul></li><ul><li><h3>Cost and Accessibility</h3><p>More affordable and user-friendly for home crafters.</p></ul></li><ul><li><h3>Versatility</h3><p>Offers design capabilities for a wide range of crafting projects including cards, custom apparel, and home decor.</p></ul></li></li></ul><p>For laser cutting, you'll need a specialized laser cutting machine, but a Cricut Maker is a great tool for a wide range of cutting tasks using blades. Each tool shines in different crafting scenarios!</p>
Hello all. I'm trying to print, then cut on my Cricut Maker. What printer would you all recommend that would be able to handle the 65-80lb cardstock?
<p>Printing and cutting cardstock with a Cricut Maker can be a delightful endeavor!</p><ul><li><h3>Printers suitable for 65-80lb cardstock</h3><ul><li><h3>1. Inkjet Printers</h3><p>Inkjet printers are often recommended for thicker cardstock as they typically handle a variety of paper weights well. Look for models that explicitly mention high gsm compatibility.</p></ul></li><ul><li><h3>2. Canon PIXMA Series</h3><p>Known for their ability to handle heavy cardstock, these printers offer excellent print quality for craft projects. Models like the PIXMA TS9521C are popular among crafters for their versatility.</p></ul></li><ul><li><h3>3. Epson EcoTank Series</h3><p>These printers are praised for their ink efficiency and ability to print on various types of cardstock. The EcoTank ET-2760 is a sturdy option that is often recommended.</p></ul></li><ul><li><h3>4. HP Envy Series</h3><p>The HP Envy Photo 7855 offers a blend of affordability and quality, handling cardstock with ease. It's a good balance for those who craft frequently.</p></ul></li></li><li><h3>Tips for Choosing a Printer</h3><ul><li><h3>Check the Printer Bezel Size</h3><p>Ensure that the printer's specifications support the media weight you plan to use, especially for cardstock which is generally thicker.</p></ul></li><ul><li><h3>Front and Rear Feed Options</h3><p>Having both feed options can be beneficial for handling thicker media. A rear feed is often better for heavier cardstock.</p></ul></li><ul><li><h3>Print Resolution</h3><p>High print resolution is crucial for detailed designs. Look for something with at least 1200 x 1200 dpi for sharp and vibrant prints.</p></ul></li></li></ul><p>Happy crafting! With the right printer, your Cricut Maker projects will surely come to life beautifully. 🌟</p>
Hello all. I'm trying to print, then cut on my Cricut Maker. What printer would you all recommend that would be able to handle the 65-80lb cardstock?
I have an Epson Ecotank 2850 that I use for ink jet printing, and it does a great job of handling my cardstock (65-80 lb.). I keep the settings on presentation matte and the quality set to high.
<p>Printing and cutting is a popular technique in crafting, especially for creating stickers, decals, and custom shapes.</p><ul><li><h3>Steps for Print Then Cut</h3><ul><li><h3>Create Your Design</h3><p>Design your image using design software. You can use Creative Fabrica Studio, which offers a wide variety of graphics, fonts, and elements. Ensure your design fits within your printer's page size.</p></ul></li><ul><li><h3>Print the Design</h3><p>Send your design to your printer. Use sticker paper or cardstock depending on your project. Ensure your printer settings are set to the right type of paper.</p></ul></li><ul><li><h3>Prepare for Cutting</h3><p>Transfer the printed paper to your cutting machine mat. Load it onto the machine.</p></ul></li><ul><li><h3>Scan and Align</h3><p>Most cutting machines, like Cricut, have a scanning feature to detect specific alignment marks on the printed paper. This ensures precise cutting.</p></ul></li><ul><li><h3>Cut the Design</h3><p>Use your machine’s software to send the cut job. Be sure to select the right material settings so your machine knows how deep to cut.</p></ul></li></li><li><h3>Tools and Materials Needed</h3><p>1. Printer (inkjet or laser)
2. Cutting machine (like a Cricut or Silhouette)
3. Design software (Creative Fabrica Studio is a great choice)
4. Sticker paper or cardstock
5. Cutting mat and adhesive (usually part of the cutting machine setup)</p></li></ul><p>Once you master the print then cut technique, you'll be able to create precise and professional-looking projects with ease! 🌟</p>
I'm creating a larger than the mat birthday party prop how can I hide the seams?
<p>Creating a larger-than-mat birthday party prop can be a delightful project.</p><ul><li><h3>Techniques for Hiding Seams</h3><ul><li><h3>Strategic Placement</h3><p>Align seams in areas where they will be less noticeable or naturally blend in with the design. For example, on edges or in creases.</p></ul></li><ul><li><h3>Overlap Technique</h3><p>Slightly overlap the pieces and use adhesive to secure them, ensuring the overlap is minimal to maintain a smooth surface.</p></ul></li><ul><li><h3>Decorative Elements</h3><p>Use elements like ribbons, fake flowers, or other embellishments to cover seams naturally and enhance the overall design.</p></ul></li><ul><li><h3>Paint or Markers</h3><p>Use matching paint or markers to color over the seams, blending them into the design.</p></ul></li><ul><li><h3>Clear Tape or Glue</h3><p>Utilize clear tape or glue to secure the seams properly, ensuring they remain flat and less conspicuous.</p></ul></li></li><li><h3>Additional Tips</h3><ul><li><h3>Material Selection</h3><p>Choose materials like thick cardstock or foam board which can be easier to align and adhere seamlessly.</p></ul></li><ul><li><h3>Template Precision</h3><p>Create accurate templates and cut pieces very precisely to ensure they fit together snugly.</p></ul></li></li></ul><p>By using these techniques, your larger-than-mat prop should look seamless and stunning for the birthday party. Enjoy the crafting magic! 🎉</p>
Can I use a regular home printer to print 3D SVG templates, or do I need a specialized printer?
<p>Creating physical objects from 3D SVG templates requires a bit more than a regular home printer.</p><ul><li><h3>Printing 3D Objects</h3><p>For printing 3D objects, a specialized 3D printer is required. These printers add layers of material to create dimensional forms from digital designs like SVG files.</p></li><li><h3>Using SVG Files for 2D Printing</h3><p>If you're looking to print 3D SVG templates as a flat design, you can certainly use a regular home printer to print these designs on paper or other printable materials.</p></li><li><h3>Crafting with SVG Files</h3><p>You can use 3D SVG files with a cutting machine like a Cricut or Silhouette to cut out pieces that can be assembled into a 3D model.</p></li></ul><p>For crafting projects that involve assembling cut pieces, using a cutting machine with SVG templates is often the way to go. Enjoy turning those digital designs into real-world creations!</p>